Monday, 18 March 2019

A Year in Preserving - Confit of Duck

Confit of duck is probably the most stereotypical French brasserie dish. It is difficult to imagine settling down to lunch in an establishment, in Paris, on a corner, with tables outside and waiters in waistcoats and not seeing it on the menu. This has led to the assumption that it is a very complex and "chefy" dish requiring skills learnt over many years and a massive batterie de cuisine. This could not be further from the truth, it is a simple dish with it origins in the frugality of rural France.
Fat is the  key. Glorious, rich, delicious fat. The people of Gascony in France enjoy some of the lowest levels of heart disease in Europe yet their diet is very high in both goose and duck, two very fatty meats. We in the UK tend to only get excited about the fat of these two birds at Christmas when we are looking for the perfect roast potato. However, in France they have been using duck fat to preserve the duck flesh for centuries. Again the necessity of preservation has led to the invention of gastronomic genius. This dish comes from an era when the closest thing to a fridge was a larder, probably a North facing room with slate shelves to keep food as cool as possible.
A great deal of meats can be confit but by far the most common is the duck leg and this preservation is a really simple two part process: Salting to cure followed by cooking and sealing in fat. The recipe below is for the simplest form of confit, adding spices to the cure is perfectly acceptable but I tend to keep the dish as pure as possible.

2,4 or 6 Duck legs
Salt
Duck fat (I have used pork lard with no drop in quality)

Place the duck legs in a large bowl and sprinkle over salt, just enough to give a light covering. Pop them in the fridge for about six hours. They will loose a bit of water and firm up a bit.
Take the legs out of the fridge and wash off the salt making sure that you then dry the legs thoroughly.
Melt the fat in a large casserole and carefully place the legs into this fat until the are all in the fat and covered.
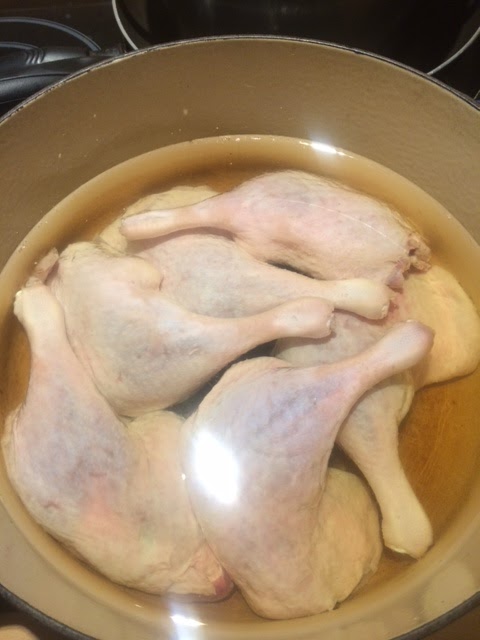
Duck legs in the melted fat
Pop the lid on the casserole and put it in the oven at about 150 degrees centigrade. Leave them alone in the oven for a little over an hour, when you take the lid off there should be a lovely and light brown and smelling wonderful. 
Take the duck out of the oven and allow it to cool in the "larder" until set, its worth checking that all the duck is under the surface of the liquid before it sets. With the duck cured and cooked and also all the air now excluded, this food has a considerable shelf life.
When you want to finish the duck, you simply pull it out of the fat, wipe as much as you can of the skin and put it in a hot oven on a tray for about 15 minutes to crisp up the skin.
Out of the fat and ready for finishing.
 
The only question you have left is what to serve with your confit. For me, the summer calls for a simple frisee salad with some lardons of un-smoked bacon all dressed with a sharp vinaigrette . In the winter a pile of puy lentils mixed with sliced onions and lardons (again).


Tuesday, 19 February 2019

A Year in Preserving - Dry-Cured Tenderloin.

Those of us who serve at the chalk face love a good text book. This does not mean we love every text book, only that we love a good text book.
A short while ago, when I was starting to show some interest in curing and preserving meat, the Beautiful wife bought me a few books online and they have all been instructive, some of them outstanding. One of these books was the fantastic Dry-Curing Pork by Hector Kent.
Hector Kent's brilliant book.
The reason that this is such a good book is that it is written by a teacher in the form of a text book. There are clear instructions on every recipe, the sections on such things as Nitrates and Nitrites are simply written and the overall tone is positive and helpful. Every recipe has a section entitled "What this recipe teaches" which explains the skills and the knowledge gained whilst producing the recipe. It is the perfect text book for grown ups! Further to this its paints a picture of the Kent's lifestyle which is very seductive indeed.
For my first attempt at a genuine air dried meat I chose the recipe for Dry-Cured Tenderloin. I have, in the past, made bacon with commercially made cures but this was the first time I went completely from scratch. I have a small, 6 bottle wine cellar, which is basically a fridge that will hold a temperature at 8 to 15 degrees centigrade. This is the perfect little aging cellar for my tenderloin.
To keep curing simple there are two basic types of cure, cunningly called Cure #1 and Cure#2. Cure#1 contains nitrites and Cure#2 contains nitrates. Cure #2 tends to be used for longer cures and drying times as it is safer.
The recipe below explains the process and some of the methods used. Owing to the fact that curing meat requires accuracy the quantities required for the cure are shown as a percentage of the weight of the meat. I must stress that this recipe is not my own but Mr Kent's. We are all students at some level.

Dry Cured Tenderloin
1 Pork tenderloin

Cure
3% Salt
0.25% Cure (I used #2 but #1 would work)
0.25% Black Pepper
0.5% Garlic Powder

The meat should be trimmed and made as smooth as possible. It should then be weighed and the quantities for the cure calculated. (In the book Kent even provides a quick tutorial on percentages!)
The meat and all the cure ingredients should then be thoroughly mixed in a freezer bag and as much air as possible removed. This should them be placed in an ordinary fridge for two weeks. I should be turned and mixed a little regularly.
After the curing, the meat should then be washed of all the cure and dried with a kitchen towel.
The meat must then be weighed and the weight recorded.
Kent's recipe suggests that the meat should be cased inside a hog casing (the natural casing for a British Banger, it is the lower digestive tract of a pig) and the trussed. As I couldn't get a casing wide enough I just trussed mine, as he also suggests.
Trussed and ready to dry
When fully trussed the meat should be hung in the "cellar" for about two weeks until it has lost 30% of its weight.
The Tenderloin in its Cave
It might produce a white mold on the outside, should this happen it is simply wiped of with a kitchen towel soaked in vinegar.

The finished article
I was truly delighted with the final product and I shall be curing two more of these at the weekend. The texture and mouth feel was not unlike a Bresaola but with a porky, garlicy taste. This is a strange thing to write but it tasted very much like French preserved meat and sausages. My next adventure in curing meat will be some Saucisson Sec in a French style, but my next Blog post will be article on Confit Duck Legs.

Sunday, 27 January 2019

Rights of passage.


Towersey festival takes place in Thame every August Bank Holiday. It used to be held in Towersey itself but owing to size was moved a couple of miles down the road a few years ago. It is a folk music festival that grew out of a Morris dancing festival. I have both been a visitor and worked at the festival in the past and it is truly a family friendly four or five days. Many families make it the last few days of a camping and touring holiday. Many thousands of people descend on Thame and the atmosphere is, by and large friendly and kind.
I suppose the mixed demographic helps with this, as well as the fantastic level of organisation. The fact that Toweresy and Thame are within 40 minutes walk of Corner Cottage means that the Beautiful Wife and I can visit without worrying about having a drink or two if we fancy ( Folk music and Real Ale are seldom far apart).
During the festival last year I was in Waitrose choosing a couple of beers when I witnessed an encounter between a mother and her teenage daughter which moved me more than I thought it would.
They were  chatting about what beer the girls father would like and spotting ones they had seen him drink before. Having made their decision, the mother asked the girl, who was probably 15 or so, what she was going to have to drink. The girl headed off towards the soft drink section. Her mother then said " I thought you liked Cider?".
The girl looked surprised and with her head on one side asked quietly "I that alright?"
The reply came "Of course, we trust you, and you'll be with us anyway"
I'm still not sure why this generational encounter moved me but I'm sure it is to do with the fact that this honest and open communication is often what is missing in young people's lives. Legality aside, this young woman was learning to drink socially and not necessarily to excess with support and respect. It just seemed right.
On a different note, A year in Preserving carries on, this afternoon I have trussed a tenderloin of pork which has been curing in my fridge for 2 weeks. It is now in my mini wine cellar at 15 degrees drying. More of this later.


Sunday, 13 January 2019

A Year in Preserving. To begin - Marmalade

I have blogged on many occasions about marmalade. I am not going to re-hash any of those posts, surface is to say, like most jams and preserves home made marmalade is always better than anything you can buy in a shop. Below I have written my simple marmalade recipe. Please feel free to play with this recipe, add booze (whisky and brandy work well though I've never tried rum), mix up the sugars maybe to add some richness.

Seville Orange Marmalade
Ingredients
1kg Seville oranges
2kg Granulated sugar
2 ltr water

Cut all the oranges in half, scoop out the flesh and some of the pith of each half with a tea spoon.


Squeeze all the juice you can out of the flesh and pips, add this liquid to a large pan. Wrap the pulp and pips up in a square of muslin, tied at the top Dick Whittington style, attach this to the side of the pan with another length of string.


All of the skins and pith must now be shredded. I have been lent an antique to help with this - The Magic Marmalade shredder. This Victorian piece of kit was a joy to use and after over 100 years could still do the job!

All the shreds need to be added to the pan with the pith bag, squeezed juice and add the water. This is then boiled for about 90 minutes.

Now lift out the pith bag with a pair of tongs and place it in a sieve. Gently squeeze the bag gently with the tongs over the boil. Do not touch this with your hands it will be as hot as the sun! then discard all the pith.
Now the sugar should be added and stir until it is all dissolved. Bring the pan to the boil and continue to boil until the setting point is reached.
Setting point is the almost magical point where sugar, acid and pectin conspire to produce a solid jelly at room temperature; it is the basis of all jams! The simplest of tests for setting point is the wrinkle test. The wrinkle test is carried out by placing a small plate in the fridge at the start of your preserving session. When the marmalade has been boiling for a while and appears to be thickening, get the plate out and dribble a small droplet onto the cold plate, leave it for a few minutes and then push the droplet with a finger (be careful it may still be hot). If the droplet wrinkles, then you have reached setting point.
Take the pot off the heat and leave it alone for about 5 minutes, there is likely to be a scum on the top. Now is the time to pot up your marmalade. I do this by pushing the scum to one side and using a special funnel.

At the end you will be left with the scum, I pop this into a spare jar and keep it for use in recipes that require marmalade (a cheats sweet and sour sauce, marmalade cake, etc).
I like to hand write my labels, but whether you print them or write them it is vital that you clearly label what the product is and the date it was made. I have some mystery chutneys from a few years back and i'm a little scared to try them!

There are about three weeks more of the Seville orange season left this recipe will make you about 7 standard pots for the rest of the year so its probably worth doing two or three batches! Homemade marmalade is nearly always better than anything you could buy in a shop at any price, it is supposed to be bitter and sweet. It was once said that it should be, to the taste buds as a cold shower is to the rest of the body first thing in the morning. Happy preserving!

Tuesday, 1 January 2019

A Year in Preserving.

I do not own a freezer, there is a small freezing box at the top of the fridge but a pack of frozen peas and bag of oven chips fills that up so its not what you would call storage. I say this not because I feel I need a freezer it's just that the snug kitchen at Corner Cottage does not have the space for a freezer. For the same reason there is no dishwasher or tumble dryer. The reason for my mentioning my lack of white goods is to introduce the theme for a year of writing. This year I will be looking into how we can preserve food without freezing.
There is a certain irony here: The historical methods of preservation have created our luxury items. The methods used in the past to ensure that food would not spoil have created products that are now of greater value than the original product. This added value has come through the process of preservation, in this way necessity has created quality. The price of smoked salmon is, weight for weight, over twice that of fresh salmon.
My friends, who know I'm an avowed foodie, often give me their excess vegetables and fruits if they have a bumper harvest. This act of generosity means I often find myself with carrier bags full of courgettes or apples and, with no freezer, I am forced (without any real malice!) into finding ways of giving these products greater longevity. In food terms it is worth remembering that, historically,  this would have been the difference between thriving through times of fresh food paucity and really struggling for nutrition.
Today is New Year's Day and we are half way through the season of Christmas. As a nation we have indulged in Smoked Salmon, Mince pies, Chutney with Cheese, sausages wrapped in Bacon, Chritmas Cake, Cranberry Sauce, and so many other preserved products. We tend to lose track of the fact that these treats are all preserved from earlier when the seasons provided us with plenty. The idea of a 'feast' was just this: Food saved for a special occasion.
For me, it all started with a gift of Seville oranges that a friend had purchased in error. They became my first marmalade and thus started a decades long obsession with food preservation. I now salt, smoke, jam, pickle, dehydrate and dry foods for eating later.
Our food consumption has become one of the many offspring of globalisation. This is not all bad. The ability to buy bananas all year round is a triumph, as is the availability of many exciting ingredients. However, global food waste is a international disgrace. Our commodification of food and our lack of respect for the resources required to produce food should shake us all. The preserving of food does not have all the answers to these difficult international problems but it is, without doubt, part of the solution rather than part of the problem.
So with my lack of freezer and some fairly rudimentary equipment, this year I shall be reporting on all the preserved foods that are created during their season. Happy New Year!

Saturday, 18 August 2018

Day four!

It goes on!
Today was a day to move forward with the courgette mountain. Having used some in a chutney, and some in a Picalilli over the past week it was time for them to take centre stage. I am grateful for the inspirational recipe I found on http://larderlove.com for grilled courgettes in oil.
This recipe is very simple but also quite time consuming, so don't expect to be finished in 5 minutes.
The first thing to do is to turn the courgettes into thin strips, I used a swivel peeler but a mandolins would work too. These are them popped into a bowl with a drizzle of olive oil and a pinch of salt.
Then heat up a griddle pan and when it's smoking hot, the strips need to be placed on the griddle and retrieved to another bowl when brown bands of caramelisation or charring appear. It will be surprising how much the volume appears to decrease.
Lemon juice then needs to be added and very finely sliced garlic. This is simply popped into jars and covered with oil. These need to be kept in the fridge as there is no real preservative in the mix. I shall stir some into some long thin pasta and sprinkle with cheese next week.
Cut and ready for the griddle.

Griddles and ready for the jars.

Ready to stir into some pasta.


Friday, 17 August 2018

Day Three!

Earlier this week I saw a bargain and did not hesitate. A whole 5kg box of tomatoes for just £4. So far, they have played a major role in a Chutney, a bit part in a Picalilli and today was the day of their leading role: Tomato Ketchup.
I took 2kg of the tomatoes and chopped them into chunks. I also chopped up 4 smallish onions. I placed these all in my preserving plan with a large splash of red wine vinegar and brought it all to the boil. The pan was then turned down to a gentle simmer for just over an hour.
If you are lucky there will be no power cuts, but if you destiny is to be interrupted for an hour it's not a major issue. It's been that kind of day!
The tomatoes and onions needed t be a bit pulpy. This was then pushed through a sieve in order to remove all the pips and skins.
While this was going on I infused 300ml of red wine vinegar with a big pinch of chipotle flakes some pepper corns, a couple of bay leaves and a few crushed allspice berries. The infusion was done by heating the vinegar to boiling point and adding the bits and bobs then allowing it to cool. (Through the power cut if that works for you)
The pulp was then returned to the heat, the strained vinegar added and 100gms of dark sugar added. This was brought to a gentle boil until reduced by about 50%. The ketchup was then popped into 2 standard jars.
Ready for their labels