Saturday, 7 September 2019

A Year in Preserving - Damson Jam

At this time of year there is always a bit of a sense of "Here we go!" in the preserving world. There is a profusion of fruit and vegetables ripe for being preserved and hidden away for times of less bounty. There is also a sense of fear that I won't get it all done and this is not helped by the fact that, largely, I am not in control of the supply of ingredients for preserving. In some years, all the berries and fruits line up in neat chronological order and it a very simple task to organise and take on one recipe every weekend. Then there are the years like this one, where everything seems to come at once! In the past ten days I have gathered or been given enough fruit for 4 different preserves. This puts a degree of pressure on the kitchen, especially when one is trying to make the most of the last few days of the warm sunshine.
I propose to write 4 separate blog ;posts covering these preserves so they may be a little out of time. I shall start with Damson Jam.
The start of something lovely.
There are two problems with Damsons: Firstly, they are different, depending on where you are in the country. Damsons, plums, bullaces and gauges tend to change their name geographically. They are all related, merely having different sizes, colours and sweetness levels. The Damsons I used looked like small (bit not tiny) blue/purple plums.
Fruit in the preserving pan
The second problem with Damsons is the fact that their stones are extremely difficult to remove. I did this by making my initial boil with the fruit whole and sieving and picking out the stones when they had split from the flesh with the heat.
My late father loved Damson Jam for the slightly strange reason that the skins of the fruit tend to form into tiny, chewy lumps rather like penny sweets.
I do not own a damson tree but, for the last few years a huge bag has been supplied by a very dear friend which contains enough for a batch of Jam and 2 or 3 ltr of Damson Gin (Post to come soon). The sharing of the plenty at this time of year is a very basic and lovely human instinct. Communities are always stronger if they share and look after each other. I will, of course make sure that the donor has a pot of Jam or two soon.
The pulp with stones removed
(As I am typing this I am looking at the bag of Bramley apples dropped off by another friend, earlier this week). The recipe below is quite simple (putting aside the stone removal) and it is the formula I use when starting to develop a recipe. In essence, if the fruit is quite tart, equal amounts of sugar and fruit are used.


Damson Jam
2 kg Damsons
2 kg Sugar
250 ml water

Wash the fruit and pop, whole, into a preserving pan (or a large saucepan) with the water. Bring to the boil and then simmer until the fruit has all broken down. Judicious use of a potato masher or ladle can help with this. When all is pulpy and soft, force it all through a sieve.
Pick out the stones from the remnants in the sieve and put the remaining, stoneless pulp back into the mix.
Adding the sugar

Add the sugar bring to the boil. Boil the mix until the setting point is achieved (There are loads of ways of doing this, but after a few jams, you start to gain a feel for it).
Allow the Jam to cool a little and then pot in sterilised jars. Pop the lids on, allow to cool and then store. Make sure you give plenty away to keep the virtuous circle moving.

Note. I do not put any of my jams into competitions, so I am not too worries by a few bubbles of scum at the top of some of my jams. In fact the last half jar or so, which is nearly all bubbles gets popped in a jar too. I use this jar first on toast or in a Victoria sponge. To date I have had no complaints.
The finished article. With credit given to the fruit donor!


Wednesday, 21 August 2019

A Year in Preserving - Pickled Shallots

The ploughman's lunch has almost become a cliche and its history will be argued about every time people sit down to a hunk of bread, a slab of cheese and a pickled onion. There is little doubt that this is the sort of lunch that a farm labourer would have taken with him into the fields to satisfy his hunger as his horses rested. However, during the 1970's it became standard fare in pubs across the country. It requires very little skill or time to prepare, thus not requiring a chef. It was made up of relatively cheap ingredients (at least compared to cold meats). It was also cold so did not require a full kitchen in which to prepare it.
I love the simple combination of bread, cheese and something acidic and strong flavoured. The powerful sharp kick of a well made pickled onion cuts through the fattiness of the cheese and seasons the whole meal. The only thing missing is a pint of foaming English ale!
We have pickled food in brine or vinegar for many centuries. As a method of preserving it is very effective. The acidity or salinity prohibits bacterial growth and as they are liquids, oxygen is excluded minimising spoilage.
My paternal grandmother produced wonderful pickled onions. Strictly speaking she pickled shallots, but she wasn't a woman one corrected. It is a shame that she passed away long before I was interested in food and so I was never able to steal her recipe but over the past few years I have developed a method of pickling onions/shallots which has never failed me.
At this time of year I purchase a couple of kilos of shallots and start pickling with one eye on the Festive period of midwinter.
Sarsons have been making vinegar since the 18th century and I always have one of their large jars of pickling vinegar in stock. These large bottles are also perfect for making your pickled onions in as they have a nice wide neck and the labels are placed on the jars with water soluble glue (I wish all producers would do this as it would make re-using much easier and cut down on the amount energy involved in recycling glass.)
On the subject of pickling vinegar, you an add any robust spices to the manufacturers product and despite what people say, left over vinegar can be filtered (I use muslin) and used again, though you will need to add some more fresh vinegar. I kid myself that I'm building up some kind of Solera system over years with this, much like the method used with some Sherries, but I suspect it is more about my imagination than any culinary truth.

Pickled shallots (will also work for onions)

Shallots (I used about 2.5 kg)
Pickling vinegar
Salt
Spics (Dried Chillies, Black peppercorns, Bay leaves, or whatever you fancy)

Place the shallots in a large colander and pour over boiling water. Leave them for 3 or 4 minutes and then peel them.
Blanched and ready to peel

Place them in a bowl adding a good handful of salt for every layer of shallots.
Leave this bowl in the fridge for 8 to 24 hours. (I tend to go for about 16 hours)
Ready for pickling

Wash the shallots and dry them on a tea towel.
Pop them in jars with your spices and pour on the vinegar. Make sure that your onions are covered and that your spices are forced down if they float or trapped if they sink. Be careful with chillies, if you add too many you may render the onions inedible, I know this from bitter, or rather burning experience. 
Ready for storage

They will be perfectly good after about 5 weeks but will continue to improve for many months. I recommend you taste regularly to make sure!
Note - The salting process is vital. The reason why a lot of commercial pickled onions are soft and lack crunch is because they have been brined and not salted. This means that they maintain weight but loose firmness. A pickled onion without firmness is not very appealing.
I began this piece focusing on the Ploughman's lunch. Generally I tend to serve pickled onions and shallots with a cheeseboard or a supper board made up of dried meats and cheese, or I simply place them alongside the feast of leftovers that is, Boxing Day Lunch.

Wednesday, 31 July 2019

A Year in Preserving - Rumtopf

When looking into the historical reasons for preserving foods they tend to fall into two categories: Foods to get us through times when we may not have enough nutrition to cope and also, foods which we want to keep for a special occasion or feast.
In Europe, lots of foods are preserved and put away for Christmas. It seems strange typing about Christmas at the end of July but for our forefathers and mothers this would have been the start of the planning for the feast of the Christ Child. At a later date I will discuss the culinary masterpieces that are Mince Pies and Christmas Pudding but for now, I will tell you about a treat which has fallen out of favour of late, The Rumtopf.
As with much in the food world there is much controversy that surrounds this boozy preservation of fruit, not least its origins. The Germans claim it, as do the Austrians, the Danish and the Northern Italians. I'm sure that the truth about who first preserved fruit in Rum in an earthenware pot will never be known, and I'm pretty sure it matters about as much as the pronunciation of Scones. Suffice is to say that this practice happened somewhere in central Europe first.
The idea is quite simple. One takes an earthenware pot with a lid and pops in it soft fruit as the summer and autumn season progresses. One covers the fruit with rum (and a little sugar) every time a new fruit is added. This way the fruit turns into boozy compote for pain perdu or waffles and the remaining liquid is a perfect late night toast to the birth of Christ or to see in the New Year.
My mother had owned a decorated Rumtopf pot for many years without ever using it so being the good son I stole it last New Year and, on the 1st of July I began preparations for Christmas.
The first fruit to go in was Strawberries (01.07.19)
Then some gifted Red Currents (06.07.19)
Followed by Apricots from the veg box (22.07.19)
After that some Plums from the veg box (31.07.19)
I await now some Scottish Strawberries to be followed by gathered Blackberries (the ultimate free fruit) and then I will probably be at the top of the pot.
Many of the recipes I have read suggest that the rum should be of a Central European type and definitely over proof. I have just used Lambs Navy as the cost of getting hold of very expensive rums would be a little too rich!
  

Saturday, 6 July 2019

A Year in Preserving - Smoked Salmon

It is hard to imagine a time before Smoked Salmon. It is especially hard to imagine Christmas or New Year without this luxury. Yet in the greater history of Christmas joys it is a relative new comer; in its present form it has only been around for a little over 100 years. Whilst fish has been smoked in the UK for many centuries the curing and cold smoking of salmon can trace its origins back to 1905.
Eggs Royale the perfect
Christmas breakfast
During the first decade of the twentieth century, The UK became a place of refuge for those, especially Jews, facing persecution in Eastern Europe. Many settled (as many immigrants did before and after) in the East End of London. One such was a man called Forman. The story goes that this finder of asylum began to smoke salmon and other fish imported form the Baltic. These fish had been transported in salt or brine and were not of the best quality upon their arrival in the docks of the East End. It was only after a visit to Billingsgate Market that Mr Foreman realised that Wild Scottish Salmon was a thing of enormous beauty and was available without weeks of travel. The Formans salted this fish, dried it and then smoked it : The London Cure was born.
Forman's is still going under the fourth generation and without doubt produces a product of superb quality, however, it is perfectly possible to produce smoked salmon at home with some very simple kit.
A couple of years ago I went on a food smoking course a a food school near Milton Keynes called Coldsmoking. (they can be found at coldsmoking.co.uk ) The school is run by an ex fire fighter called Turan, and the day under his instruction was a wonderful way to spend a damp November Saturday. From thence forward I have never bought smoked salmon!
The kit
So how is it done? The only kit required is a, quite inexpensive, smoke creator and a cardboard box (specialist ones are available online but not always necessary).

Ingredients
1 Salmon
Salt

If buying a whole fish make sure it is filleted and pin-boned, if you are unsure about how this is done get you fishmonger to do it for you or simply buy in single fillets.
The salmon should be laid on a tray and sprinkled liberally with salt, concentrating, especially on the thicker parts of the fish. This should then be placed in the fridge loosely covered with baking parchment for 6 to 24 hours depending on the salt you use (more hours if you are using kosher salt or a sea salt like Malden).
Salted and ready for the fridge
After its day in salt the fish should be washed of the salt and thoroughly dried. This is then placed back in the fridge for another 24 hours.
The fish will come out with a slightly sticky surface (a pelicile) and it will be firmer and feel a bit more "meaty". Now is the time to bring on the smoke. The type of wood dust you use is a matter of choice and, to be honest, I'm still experimenting but please buy food grade dust or chips - you don't want chainsaw oil in your burner!
The cook checking for smoke
The box is placed outside, the fish placed on racks within the box and the burner lit. Now its just a matter of time. The shortest I have smoked for is 4 hours but I have gone up to 6.
Then comes the hardest bit of all - The smoked salmon will be so much better 24 to 36 hours after the end of smoking - patience is a richly rewarded virtue in this case!
the easiest and most sensible thin cut is a D cut where you cut the flesh at an angle so as to cut a very thin, broad D. The is, however, a gentleman at Foreman's who can slice with a knife the full length of the fish, thin enough slices to be almost see-through.
D - cut smoked salmon

I have made Smoked salmon for friends, family, and village functions and it always goes down a storm. Unless you are prepared to spend a fortune, you will not be able to match the quality in purchased Smoked Salmon.
Give a man some smoked salmon and he is grateful; teach a man to smoke salmon and he suddenly has a lot of friends!
(Not all the photographs in this blog were taken at the same time)


Tuesday, 23 April 2019

St Georges Day - Spears and such.

Today is the Day of the Patron Saint of England. In Wales, on St David's day they hold eisteddfods (a Welsh cultural festival involving music drams and especially Poetry) in schools and give the kids a half day, everyone wears a daffodil or a leek showing their Welshness, In Scotland on St Andrew's day you can't move for tartan and the Saltire painted on faces. I'm sure I don't need to explain the joyous chaos of St Patrick's day. However, in England the Day of St George passes almost without comment. It might be that much of the imagery has be hijacked by racist thugs, or it might be that there is a sense of English reserve but whatever the cause, we English don't really shout about it.
Nature does not keep a diary, after millenniums of adaptation, crops appear when their genes tell them there is the greatest chance of success and not on a certain date. Part of being human is feeling the need to codify, explain, organise and hold fast to structure which is why we like to "have dates in the diary".
The English Asparagus season runs from St Georges Day (23rd April) to Midsummer's day (21st June) which has a certain poetry about it, but in our hearts we know that the new years spears might arrive a little bit early or late and, indeed the crop may be finished before the longest day.
I make no secret of my love for asparagus. For me it is the final curtain being drawn on the, so called Hungry Gap where, historically, fresh food was scarce and we all survived on preserved foods and cabbage. Asparagus is clearly a vegetable of early Summer whereas the joy that is purple sprouting broccoli clearly belongs to late winter or, at best, early spring.
My fascination with seasonal foods and, if necessary, the preserving of them, grows from my parents' allotment in the 1980s. Picking vegetables at the right time was something my late father took great pride in. He would joke that it would be better to bring the boiling water to the runner beans rather than let them deteriorate on the 10 minute cycle home.
To this day I struggle with the idea of strawberries at Christmas, or parsnips in June. This is not born from sense of pious duty to the seasons its just that I have always been a person who looks forward to things and last week when I saw the first Herefordshire asparagus on sale my heart jumped.
There has been a enormous amount written about how to cook asparagus and I'm sure there is a degree of Michelin Stared perfection to be gained in some of those methods, but really, we are just making supper. Having snapped them to ensure the tender stems are eaten drop them in boiling water for a few minutes and serve, it is the exemplar of fast food. Serve it piping hot with butter (no substitutes will do) and a fried egg on top (Duck eggs are especially good in this regard). Above all keep it simple.
Incidentally, I keep the woody hard stems in the tiny ice box at the top of my fridge and build up the quantity as the season progresses. When I have a bagful, I boil then in a little light vegetable stock, whizz then in a liquidizer add some cream, season and serve with freshly baked bread and enjoy.
Please do not be very English about the amount of Asparagus you eat, you have about eight or nine weeks so go a little bit mad (in a very English way, of course) and feast.
Finally, I wish you a very happy Asparagus season, the cold glory of brussels sprouts and parsnip is dead, long live the spears of summer!


Monday, 22 April 2019

A Year in Preserving - Saucisson Sec

I have mentioned many times on this blog that I have a great love for all things porcine. My love is never more true than when dealing with the craft and art of the sausage. When trying out a new butcher I always try their basic traditional sausage first, if this is up to scratch then the rest of their meat is likely to be good too. This simple system has stood me in good stead for many years.
I have also expressed my love of books in the past and in my quest to preserve more meats, the Beautiful Wife bought me and American book called simply Charcuterie. This book is written by Michael Ruhlman and Brian Polcyn and mine is signed by Mr Ruhlman. It has a forward by the great Thomas Keller (if its good enough for him....). I have dipped into this book often and last month decided to take the plunge and make one of the recipes. I choose the Saucisson Sec recipe as I have some experience of making sausages and it is one of my favourite preserved meats. The results were very pleasing indeed and we have slowly worked our way through the batch I made. Interestingly when I started to see if anyone one else online had used this recipe, I found Charcuterie all over the place, from blogs to twitter posts, this book appears to be everyone in the States' "go to" preserved meat bible.
Saucisson Sec is one of the memories I brought back from France as a teenager, as I was too scared to bring back the product itself. The chewy, garlicy, pokiness is one of the great treats of the sausage world and that tastes was one of the ways I new I was on holiday.
As ever, I bought my pork from Orchard View Farm in Buckinghamshire (www.orchardviewfarm.co.uk) and my Prague powder #2 from The Coldsmoking Cookery School, just north of Milton Keynes (coldsmoking.co.uk). The recipe below is based on the version in Charcuterie and I cannot recommend this book highly enough.

Saucisson Sec
5lbs Pork (about 15% Fat)
50 gms Sea salt
1 tblsp Ground black pepper
15 gms sugar
7 gms #2 Prague powder
25 gms minced
1 hog cassing

The pork was ground through a 5 mm plate in a hand mixer (going up to 8 mm wouldn't be a problem). This was mixed with all the other ingredients (except the casing) until it was all fully amalgamated.
The mix, nicely amalgamated.
This mix was then stuffed into the casings and made into 15 cm links.
Linked up and ready to dry.

The links were stabbed all over with a sterile pin in order that any air might escape and the product might mature evenly. (Please do not do this if you are making traditional English Bangers or you will be left with a sad, dry digit for your breakfast as all the fat will have drained away).
Drying in my "cellar"
The sausages were then weighed and hung in my cellar (a re-purposed 6 bottle wine cooler)at 15 degrees c for three weeks.
When they had lost 30% of their weight they were tried for quality. They should be stable at room temperature now but I've kept them at 15 degrees with no apparent lowering of quality.
Skinned and ready to eat
The only problem which occurred was a slight stickiness of the skins. This may well have been caused by being a little too clean and my cellar not allowing the "good", white, powdery bacteria to grow on the outside of the sausage. No bacteria grew there!
There are any number of uses for this; from a simple snack to a tasty addition to any kind of braise or rice dish (thin Paella or Risotto, though neither of these are French). Myself and the Beautiful Wife tend to sit down with a glass of beer (sometimes English, sometimes Belgium, sometimes American), some Cheese (often a proper Cheddar, perhaps a piece of Brie, migrating across the board) and some of last year's Pickled Onions (So English that its almost too much!). Bon Appetit! and Happy St George's day tomorrow!

Monday, 18 March 2019

A Year in Preserving - Confit of Duck

Confit of duck is probably the most stereotypical French brasserie dish. It is difficult to imagine settling down to lunch in an establishment, in Paris, on a corner, with tables outside and waiters in waistcoats and not seeing it on the menu. This has led to the assumption that it is a very complex and "chefy" dish requiring skills learnt over many years and a massive batterie de cuisine. This could not be further from the truth, it is a simple dish with it origins in the frugality of rural France.
Fat is the  key. Glorious, rich, delicious fat. The people of Gascony in France enjoy some of the lowest levels of heart disease in Europe yet their diet is very high in both goose and duck, two very fatty meats. We in the UK tend to only get excited about the fat of these two birds at Christmas when we are looking for the perfect roast potato. However, in France they have been using duck fat to preserve the duck flesh for centuries. Again the necessity of preservation has led to the invention of gastronomic genius. This dish comes from an era when the closest thing to a fridge was a larder, probably a North facing room with slate shelves to keep food as cool as possible.
A great deal of meats can be confit but by far the most common is the duck leg and this preservation is a really simple two part process: Salting to cure followed by cooking and sealing in fat. The recipe below is for the simplest form of confit, adding spices to the cure is perfectly acceptable but I tend to keep the dish as pure as possible.

2,4 or 6 Duck legs
Salt
Duck fat (I have used pork lard with no drop in quality)

Place the duck legs in a large bowl and sprinkle over salt, just enough to give a light covering. Pop them in the fridge for about six hours. They will loose a bit of water and firm up a bit.
Take the legs out of the fridge and wash off the salt making sure that you then dry the legs thoroughly.
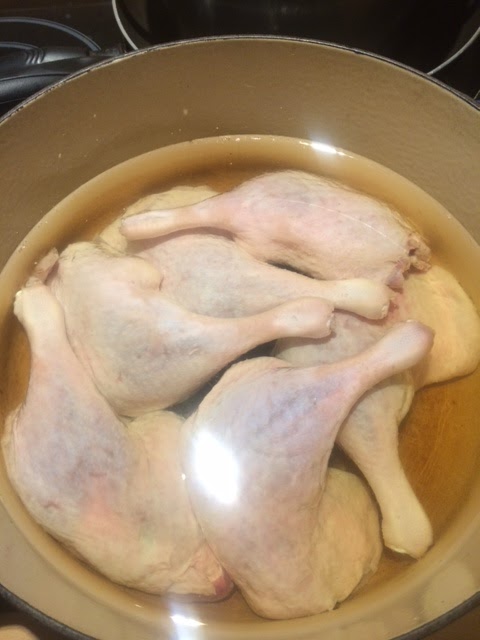
Melt the fat in a large casserole and carefully place the legs into this fat until the are all in the fat and covered.
Duck legs in the melted fat
Pop the lid on the casserole and put it in the oven at about 150 degrees centigrade. Leave them alone in the oven for a little over an hour, when you take the lid off there should be a lovely and light brown and smelling wonderful. 
Take the duck out of the oven and allow it to cool in the "larder" until set, its worth checking that all the duck is under the surface of the liquid before it sets. With the duck cured and cooked and also all the air now excluded, this food has a considerable shelf life.
When you want to finish the duck, you simply pull it out of the fat, wipe as much as you can of the skin and put it in a hot oven on a tray for about 15 minutes to crisp up the skin.
Out of the fat and ready for finishing.
 
The only question you have left is what to serve with your confit. For me, the summer calls for a simple frisee salad with some lardons of un-smoked bacon all dressed with a sharp vinaigrette . In the winter a pile of puy lentils mixed with sliced onions and lardons (again).